
Looking for a fun, easy, and adorably spooky treat to add to your Halloween party spread? Look no further than these Mummy Oreo Balls! These no-bake delights combine crushed Oreos, cream cheese, and white chocolate for a deliciously rich treat, all while being decorated to look like cute, edible mummies. They're easy enough for the kids to help with and spooky enough to impress all your guests. Ready to get started? Let’s dive into this fun and simple Halloween recipe!

What Are Mummy Oreo Balls?
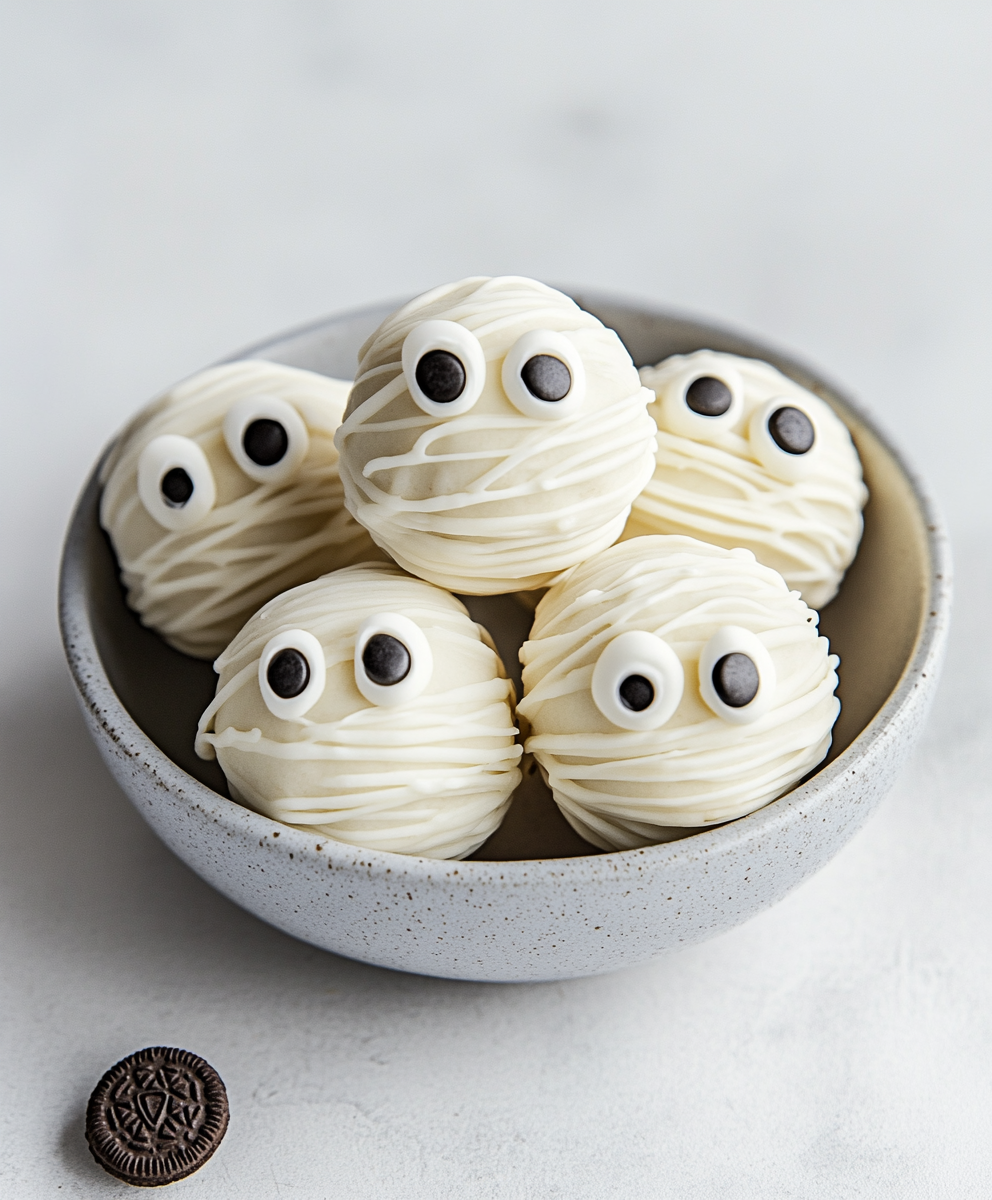
Mummy Oreo Balls are a Halloween twist on classic Oreo truffles. The recipe consists of Oreo cookies crushed and mixed with cream cheese, rolled into balls, and then dipped in melted white chocolate. What makes these treats stand out is their mummy-like appearance—white chocolate "bandages" are drizzled over the top, and candy eyes are added for a fun, spooky touch. Not only are they fun to make, but they’re also incredibly delicious with their rich, creamy, and chocolatey filling.
Ingredients List for Mummy Oreo Balls
Before you start assembling your mummy Oreo balls, make sure you have all the ingredients you need. The list is simple, and you may already have some of these items in your pantry!
- Oreo cookies – 1 package (36 cookies)
- Cream cheese – 8 oz, softened
- White chocolate or white candy melts – 12 oz
- Candy eyes – About 40-50 candy eyeballs (you can find these in the baking section or online)
- Vegetable oil or shortening – 1-2 teaspoons (optional, for thinning the white chocolate if needed)
Ingredients List for Mummy Oreo Balls (Variations)
Want to put your own twist on these spooky Oreo balls? Here are some fun variations and extra ingredients to consider:
- Golden Oreos – Swap out regular Oreos for Golden Oreos for a vanilla-flavored variation.
- Flavored Cream Cheese – Try using a flavored cream cheese like pumpkin spice or chocolate for an added twist.
- Dark Chocolate Drizzle – Instead of white chocolate, use dark chocolate to make “shadow” mummies.
- Nut Butter Filling – Add 1-2 tablespoons of peanut butter or almond butter to the Oreo and cream cheese mixture for a nutty flavor.
- Sprinkles – Add Halloween-themed sprinkles or edible glitter for extra decoration.
Substitutions and Variations
These Oreo balls are incredibly versatile, and there are plenty of substitutions you can make based on your dietary preferences or ingredients on hand:
- Dairy-Free Option: Use dairy-free cream cheese and dairy-free white chocolate to make these mummy Oreo balls suitable for those avoiding dairy.
- Gluten-Free: Swap out regular Oreos for gluten-free Oreos.
- Vegan: Use vegan cream cheese, vegan white chocolate, and check that your Oreos and candy eyes are free of animal products.
Step-by-Step Cooking Instructions
Making Mummy Oreo Balls is a fun and simple process. Here’s how to make these spooky treats step by step:
1. Crush the Oreos:
Place the Oreo cookies in a food processor and pulse until they become fine crumbs. If you don’t have a food processor, you can place the cookies in a zip-top bag and crush them with a rolling pin until finely crumbled.
2. Mix the Oreo Crumbs and Cream Cheese:
In a large mixing bowl, combine the crushed Oreos and softened cream cheese. Mix thoroughly until well combined and a dough-like consistency forms. You can use a spoon, spatula, or even your hands to ensure everything is fully mixed.
3. Form the Oreo Balls:
Scoop out small portions of the Oreo mixture (about 1 tablespoon each) and roll them into smooth balls. Place them on a baking sheet lined with parchment paper. Once all the balls are formed, place the tray in the freezer for 20-30 minutes to firm up.
4. Melt the White Chocolate:
While the Oreo balls are chilling, melt the white chocolate or candy melts. You can do this in a microwave-safe bowl by heating the chocolate in 20-second intervals, stirring between each interval until fully melted and smooth. If the chocolate seems too thick, you can add 1-2 teaspoons of vegetable oil or shortening to thin it out for easier dipping.
5. Dip the Oreo Balls:
Remove the chilled Oreo balls from the freezer. Using a fork or dipping tool, dip each Oreo ball into the melted white chocolate, making sure it’s fully coated. Gently tap off any excess chocolate and place the coated ball back onto the parchment paper.
6. Add Candy Eyes:
Before the white chocolate sets, press two candy eyes into each Oreo ball to create the mummy's "face." Repeat for all the Oreo balls.
7. Create Mummy “Bandages”:
Once all the Oreo balls are coated and the eyes are in place, drizzle extra melted white chocolate over the top of each Oreo ball using a spoon or piping bag with a small tip. This creates the "mummy bandage" effect. Be sure to drizzle in different directions for a more authentic mummy look.
8. Chill and Set:
Once all the Oreo balls are decorated, place them in the refrigerator for about 20-30 minutes to set completely.
How to Cook Mummy Oreo Balls: A Step-by-Step Guide
Here’s a quick recap of the process to make these fun Mummy Oreo Balls:
- Crush the Oreos – Pulse the Oreos in a food processor until fine crumbs form.
- Mix with Cream Cheese – Blend the Oreo crumbs with softened cream cheese until fully combined.
- Shape into Balls – Roll the mixture into small balls and place them on a lined baking sheet.
- Freeze – Chill the Oreo balls for 20-30 minutes.
- Melt the White Chocolate – Melt white chocolate or candy melts until smooth.
- Dip the Oreo Balls – Coat each Oreo ball in the melted white chocolate and tap off excess.
- Add Candy Eyes – Press candy eyes into the balls while the chocolate is still wet.
- Drizzle with Chocolate – Drizzle extra white chocolate over the Oreo balls to create mummy bandages.
- Chill and Set – Refrigerate the decorated Oreo balls until firm.
Common Mistakes to Avoid
While making Mummy Oreo Balls is a simple process, a few common mistakes can affect the final result. Here’s what to watch out for:
- Not Chilling the Oreo Balls: If the Oreo balls aren’t chilled before dipping, they may fall apart in the melted chocolate.
- Overheating the White Chocolate: Be careful when melting the white chocolate—overheating can cause it to seize and become lumpy.
- Adding Eyes Too Late: If the chocolate coating sets before you add the candy eyes, they won’t stick. Be sure to add them while the chocolate is still wet.
Serving and Presentation Tips
Mummy Oreo Balls are adorable on their own, but with a few creative touches, you can make them even more festive and Halloween-ready:
- Halloween Platter: Arrange the Mummy Oreo Balls on a spooky Halloween platter alongside other themed treats like candy corn, gummy worms, or Halloween cookies.
- Cupcake Toppers: Use these Mummy Oreo Balls as cute toppers for Halloween cupcakes!
- Serve in Mini Cauldrons: For a whimsical presentation, place a few Mummy Oreo Balls inside mini plastic cauldrons, perfect for a Halloween party table.
How to Serve Mummy Oreo Balls
These spooky treats are best served chilled, straight from the fridge. Here’s how you can make them a star at your Halloween gathering:
- Display on a Treat Stand: Arrange them on a multi-tiered treat stand for a party.
- Package as Party Favors: Individually wrap the Oreo balls in cellophane bags tied with orange and black ribbon for party favors or trick-or-treat bags.
Presentation Ideas for Mummy Oreo Balls
Here are a few ideas to present your Mummy Oreo Balls in a fun and spooky way:
- Mummy Graveyard: Place the Mummy Oreo Balls in a “graveyard” scene, surrounded by Oreo “tombstones” and edible dirt made from crushed Oreos.
- Trick-or-Treat Tray: Create a trick-or-treat tray with Mummy Oreo Balls, candy eyeballs, gummy worms, and Halloween sprinkles for a colorful and spooky display.
Mummy Oreo Balls Recipe Tips
- Use a Fork for Dipping: When dipping the Oreo balls into melted chocolate, use a fork to gently lift them out. Tap the fork on the side of the bowl to remove any excess chocolate.
- Keep the Candy Eyes Handy: Have the candy eyes ready before you start dipping to ensure you can press them in while the chocolate is still soft.
- Make Ahead: You can make these Oreo balls ahead of time and store them in the refrigerator for up to 5 days, or freeze them for up to 3 months.
Frequently Asked Questions (FAQs)
Q: Can I make Mummy Oreo Balls ahead of time?
A: Yes! Mummy Oreo Balls can be made in advance and stored in the refrigerator for up to 5 days. They can also be frozen for up to 3 months in an airtight container.
Q: Can I use dark or milk chocolate instead of white chocolate?
A: Absolutely! You can use dark or milk chocolate for a different look, although
the mummy "bandages" won’t be as prominent. You can still drizzle white chocolate on top for the bandage effect.
Q: Can I use a different type of cookie?
A: Yes! While Oreos are the classic base for this recipe, you can use any chocolate sandwich cookie or even vanilla sandwich cookies for a twist.
Conclusion
Mummy Oreo Balls are the perfect Halloween treat—fun, easy to make, and irresistibly delicious. Whether you're hosting a Halloween party, looking for a spooky snack to share, or just want a fun family baking activity, these Mummy Oreo Balls will be a hit. With their rich Oreo-cream cheese filling and adorable mummy design, they’re sure to be a crowd-pleaser. So, gather your ingredients, get creative with your decorations, and enjoy these sweet and spooky treats!
Print
Mummy Oreo Balls Recipe
- Total Time: 50 minutes (includes chilling time)
- Yield: 24 mummy Oreo balls
- Diet: Vegetarian
Description
These mummy Oreo balls are a fun and spooky Halloween treat that’s easy to make and perfect for parties. Made with just a few ingredients like Oreos, cream cheese, and white chocolate, these no-bake mummy balls are a delightful, spooky snack. Use keywords like "Halloween Oreo balls," "mummy treats," and "no-bake Halloween dessert" for easy recipe discovery. Perfect for kids and adults alike!
Ingredients
- 36 Oreo cookies (crushed into fine crumbs)
- 8 oz cream cheese (softened)
- 12 oz white chocolate or candy melts
- Candy eyeballs
- White gel icing or melted white chocolate for mummy "wrapping"
Instructions
- Crush the Oreo cookies into fine crumbs using a food processor.
- Mix the Oreo crumbs with softened cream cheese until well combined.
- Roll the mixture into 1-inch balls and place them on a lined baking sheet. Chill in the refrigerator for 20-30 minutes.
- Melt the white chocolate or candy melts in the microwave, stirring until smooth.
- Dip each Oreo ball into the melted chocolate, coating fully, and place them back on the baking sheet.
- Before the chocolate hardens, press candy eyeballs onto each ball.
- Once set, drizzle additional melted white chocolate or use white gel icing to create mummy “wrapping” lines across the balls.
- Let the mummy Oreo balls set before serving.
Notes
- If the mixture is too soft to roll, refrigerate it for 10-15 minutes to firm up.
- Store in the refrigerator to keep them fresh and firm.
- Prep Time: 20 minutes
- Cook Time: 0 minutes (no-bake)
- Category: Dessert, Snack
- Method: No-Bake
- Cuisine: American, Holiday
Nutrition
- Serving Size: 1 ball
- Calories: 160
- Sugar: 12g
- Sodium: 95mg


Leave a Reply